ShopDreamUp AI ArtDreamUp
Deviation Actions

Level 2 - Space Soul
~~ Ready for exclusive animated content? ~~ Join Space Soul and get mesmerizing 3D and 2D animations, as well as high-quality video and step-by-step process of the creation of the work. Plus, your name will be featured in the credits for animated movies. You'll also receive access to up to 15k HQ wallpapers and artworks, Discord community, and all previous content.
$7/month


Suggested Deviants


Suggested Collections


![[TUTORIAL] Using PowerDOF](https://images-wixmp-ed30a86b8c4ca887773594c2.wixmp.com/f/eb52f152-5457-4c1a-9164-f472981634fe/db8m5hd-0393f164-2823-47c1-bff6-662083c18971.png/v1/crop/w_184,h_184,x_0,y_123,scl_0.14375,q_70,strp/_tutorial__using_powerdof_by_reinbuu_sama_db8m5hd-92s-2x.jpg?token=eyJ0eXAiOiJKV1QiLCJhbGciOiJIUzI1NiJ9.eyJzdWIiOiJ1cm46YXBwOjdlMGQxODg5ODIyNjQzNzNhNWYwZDQxNWVhMGQyNmUwIiwiaXNzIjoidXJuOmFwcDo3ZTBkMTg4OTgyMjY0MzczYTVmMGQ0MTVlYTBkMjZlMCIsIm9iaiI6W1t7ImhlaWdodCI6Ijw9Mzc1NiIsInBhdGgiOiJcL2ZcL2ViNTJmMTUyLTU0NTctNGMxYS05MTY0LWY0NzI5ODE2MzRmZVwvZGI4bTVoZC0wMzkzZjE2NC0yODIzLTQ3YzEtYmZmNi02NjIwODNjMTg5NzEucG5nIiwid2lkdGgiOiI8PTEwMjQifV1dLCJhdWQiOlsidXJuOnNlcnZpY2U6aW1hZ2Uub3BlcmF0aW9ucyJdfQ.XYfiDKDDYRCIRpNOyP8j9cdxPHdRrpYQvY3Khe4Yu5g)
![[TUTORIAL] Using PowerDOF](https://images-wixmp-ed30a86b8c4ca887773594c2.wixmp.com/f/eb52f152-5457-4c1a-9164-f472981634fe/db8m5hd-0393f164-2823-47c1-bff6-662083c18971.png/v1/crop/w_92,h_92,x_0,y_61,scl_0.071875,q_70,strp/_tutorial__using_powerdof_by_reinbuu_sama_db8m5hd-92s.jpg?token=eyJ0eXAiOiJKV1QiLCJhbGciOiJIUzI1NiJ9.eyJzdWIiOiJ1cm46YXBwOjdlMGQxODg5ODIyNjQzNzNhNWYwZDQxNWVhMGQyNmUwIiwiaXNzIjoidXJuOmFwcDo3ZTBkMTg4OTgyMjY0MzczYTVmMGQ0MTVlYTBkMjZlMCIsIm9iaiI6W1t7ImhlaWdodCI6Ijw9Mzc1NiIsInBhdGgiOiJcL2ZcL2ViNTJmMTUyLTU0NTctNGMxYS05MTY0LWY0NzI5ODE2MzRmZVwvZGI4bTVoZC0wMzkzZjE2NC0yODIzLTQ3YzEtYmZmNi02NjIwODNjMTg5NzEucG5nIiwid2lkdGgiOiI8PTEwMjQifV1dLCJhdWQiOlsidXJuOnNlcnZpY2U6aW1hZ2Uub3BlcmF0aW9ucyJdfQ.XYfiDKDDYRCIRpNOyP8j9cdxPHdRrpYQvY3Khe4Yu5g)
You Might Like…


Featured in Groups


Description
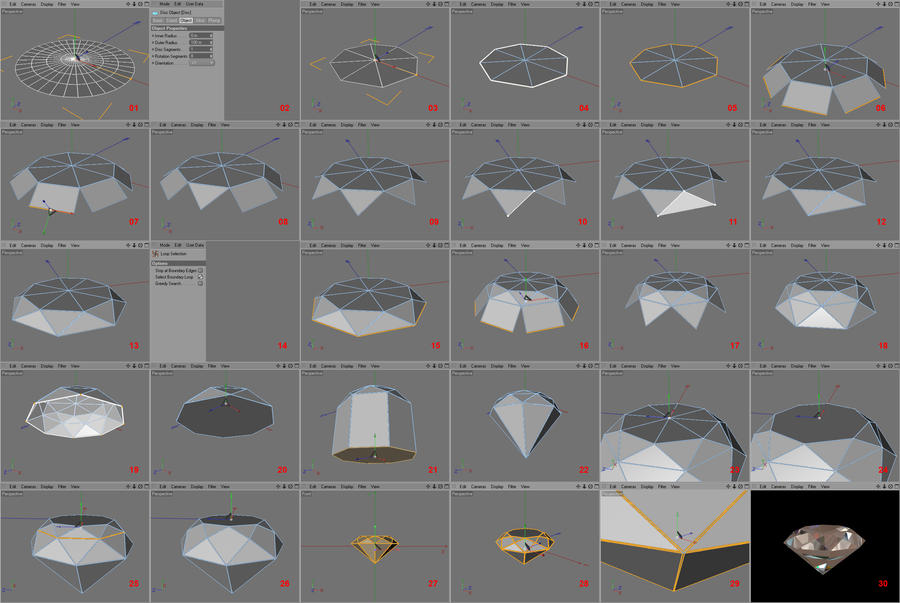
The program we use is Cinema 4D
At first, let me apologize for the big size.
But I thought It´s better to have all steps visible in front of you.
I suggest you to download the image for full-resolution and copy the text below.
Modeling a Diamond ( difficulty: easy )
1. start with a disc primitive ( objects > primitive > disc )
2. Set "disc segments" to 1 and "rotation segments" to 8 like on the picture. Now click on the Tab named "phong" in the attribute manager. You can see it on the picture. Click on "delete tag". The phong tag makes an objekt look smoother. But the diamond better gets hard edges.
3.1. The disc should now look like this. Press "C" to make the mesh editable. Activate the viewport by clicking into the empty area right next to its menu bar.
>>>by the way....
Activating a subwindow of cinema4d like the object manager or the viewport means making it respond to any key commands like ctrl+c or ctrl+v.
You can recognize the active window of c4d by its menu bar being darker than the others.
3.2. When the viewport is active, you can easily toggle through the three editing modes point (vertex), edge and face (polygon) with the enter key.
Choose the edge edit mode.
4. Now press "U" and "L" after each other to pick the loop-selection tool. When you hover over one of the discs border edges the selection tool should highlight the entire border. Click on it to make the selection.
5. You should see this right now (pic 5). Stay in edge mode and activate the extrude-tool. Extrude the edges with an offset at about 60.
Set edge-angle to about -30. Deactivate "preserve groups", so every edge is extruded separately.
6. If your mesh looks nearly like on pic 6, you did well. Good! Now it gets to the real modeling.
7. Press "M" and then "Q" to pick the weld tool. Press space to switch to normal (live-) selection. Select one of the outer edges like on the picture. Press space to change back to the weld tool. Click an empty area to melt the edge to its midpoint.
8. Repeat this with the remaining parts.
9. If you do serious work, you should save your work as often as you can. And don´t be afraid to create copys and backups of an important work. Just to get used to that, you should save your work now.
10. Press "B" to pick the bridge tool. Click and hold an edge like on the picture.
11. Drag the bridge to the next edge and release the mousebutton.
12. As you can see, the bridge tool creates new faces in a simple way.
13. Repeat the bridge action with the rest of the object until it looks like on pic 13.
14. Pick the loop-selection tool again and activate "select boundary loop" in the attribute manager.
15. Use the tool to select the boundary edges like on the picture. Very simple, ain´t it?
16. Make another extrusion. Change the edge angle back to zero. This time, the offset should be about 100.
17. Repeat the steps 7 to 9 with the new extruded edges.
18. Repeat the steps 10 to 13 with the bridge tool like you see it on the picture.
19. Press "M" and then "D" to pick the "close polygon hole" tool. Rotate the cam so you see the bottom. Use the tool on one of the boundary edges to close the hole. The edges must be highlighted. Move around the mouse a bit around the edge if it doesn´t respond at once (that sometimes happens)
20. Switch to polygon edit mode (remember, activate viewport and press enter) and press space for the selection tool. Select the new polygon that closed the hole.
The close-hole tool creates N-gons. Don´t wonder. You can handle it like a usual polygon. Therefore, I will simply call it face from now on.
21. Extrude the face like on the picture.
22. Use the weld tool to melt the face to its midpoint. Basicly, the diamond is finished. The rest is tweaking and some detail upgrading. If you want to, go on.
But I suggest you save the scene.
23. Switch to point edit mode and select the midpoint of the top surface. Press "U" and then "Z" to delete the point without deleting the bordering faces. That would happen if you just use backspace or del to delete it. Points are the basic elements of a face. Logically they disappear by just deleting the point.
This tool is called "melt" ( functions>melt ).
24. Switch to edge mode again.
25. Make a selection like on pic 25. Of course it must go completely around the mesh. You can´t use the loop selection here because of the poles ( poles = points connected to more than four edges ).
So press space for the selection tool and select those edges manually. ( don´t forget: Shift for adding elements to the current selection and control to subtract them )
26. In my example, the diamond is a little bit to high.
Select all edges ( selection>select all ) and use the scale tool ( hotkey:"T" ) to correct the proportions, if necessary.
27. Middleclick into the viewport to get the four views.
Planar view helps to get a better idea of the proportions.
28. I hope, your diamond looks more or less like on the picture. Congratulations. You have modeled a diamond.
The last steps are optional. A little detail enhancement for realistic rendering.
Stay in edge mode. All edges should still be selected.
29. Activate the bevel tool with "M" and then "S".
Bevel the edges just slightly. I used an offset of 0.4 for this.
30. A quick render to show the effect of the beveled edges.
This is it. Hope, somebody can use this.
Image size
2508x1680px 1.31 MB
Comments38
Join the community to add your comment. Already a deviant? Log In
Thank you so much for this very useful tutorial.